 Help Center
Bridge Operator Console for RingCentral User Manual
Getting Started
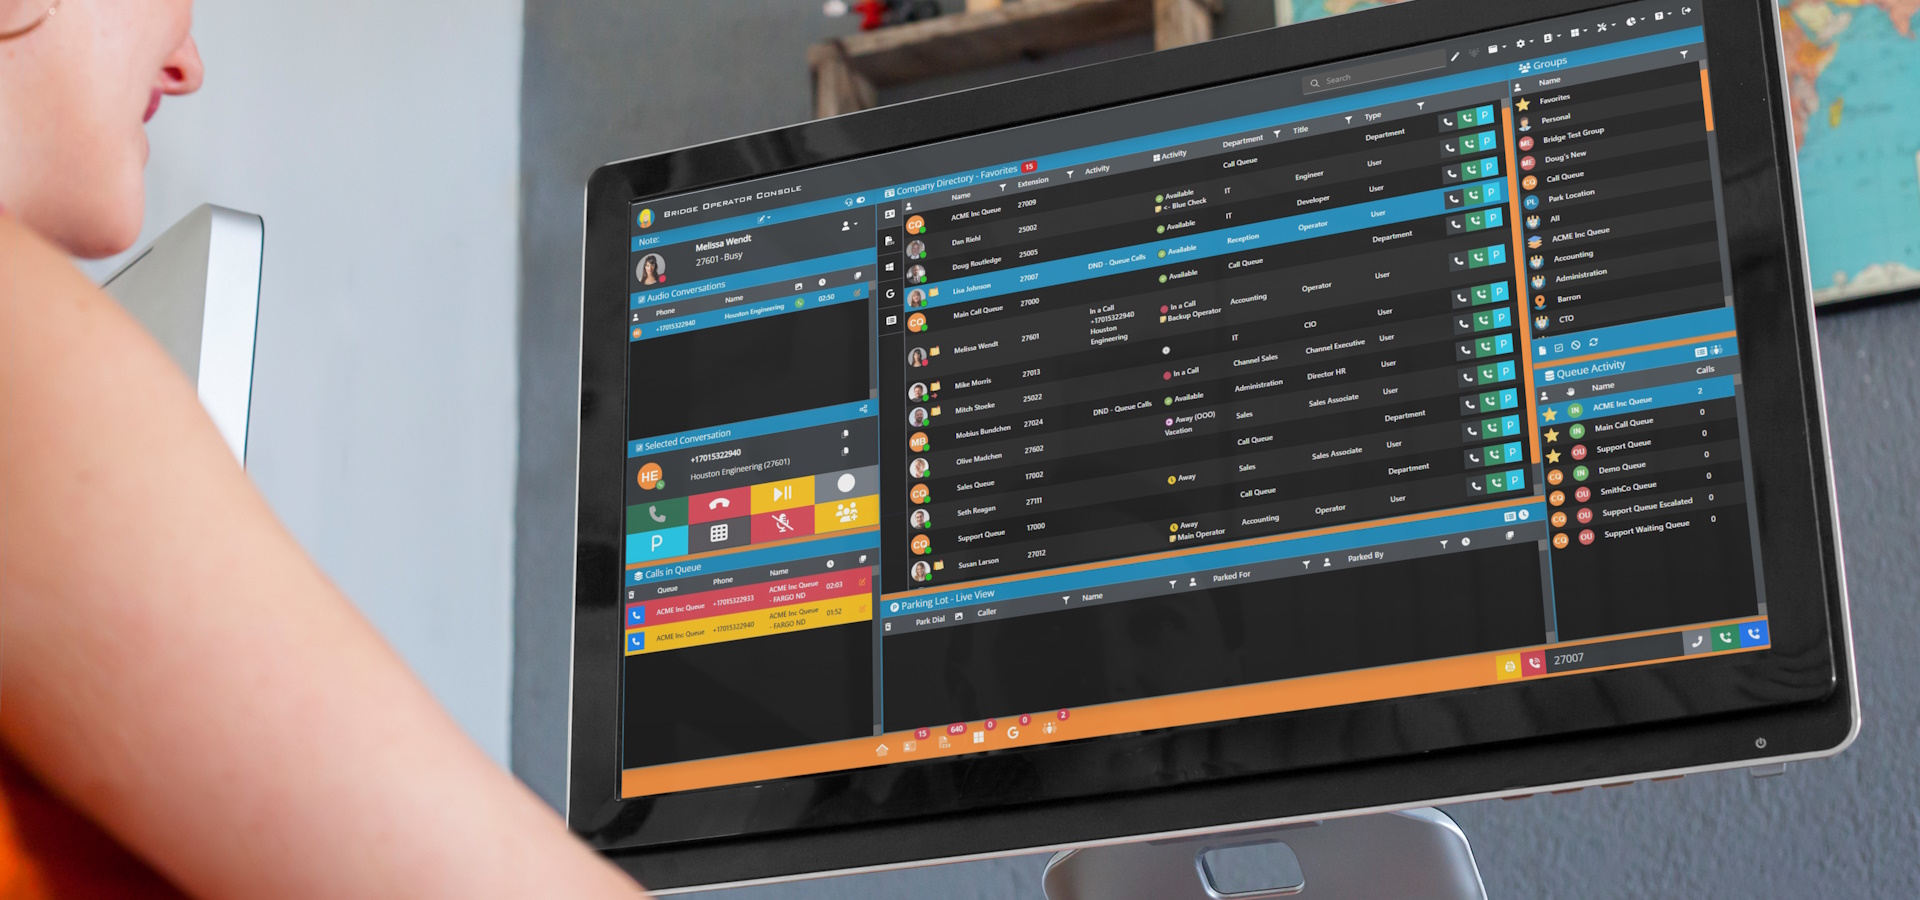
The Bridge Operator Console is a powerful tool for your organization's integration with RingCentral. In this manual, we will cover the basic features of this application, as well as some more advanced functionality. We will begin by familiarizing ourselves with the screen.

The search function for the Company Directory is located in the upper left center of the screen. To the right of this feature you will also find icons with the 'Effects' 'Notifications' 'View' 'Pages' 'Settings' 'People' 'Microsoft' 'Tools' 'Reports' 'Help' drop-down menus. You will also find the 'Sign Out' option. Additional functions are available via these drop-down menus.


'Pages' Includes options to pop-out certain portions of the screen into a separate window, including a Queue Popout, Queue Calls Popout, Queue Count Popout, Parking Lot Popout, Company Directory Popout, as well as enabling the captions window and translations.

Selecting an Audio Device

We will begin by selecting our Audio Device. Click the headset icon highlighted in red to open the 'Audio Devices' window. Select your input and output devices from the drop-down menus, and select 'Save Audio Devices'. Once saved, verify the information shown in the 'Audio Devices' window is correct.

Our application can be run in either WebRTC Softphone mode (typically a USB Headset connected to your computer) or in Device Control (a physical phone on your desk with searching and call functionality via the application). If you have a valid physical device, first ensure it is connected to your RingCentral user and is visible in the 'Select a Physical Device' list. The toggle to switch between WebRTC Softphone and Device Control are the blue and red boxed labled under the 'Telephony Mode'.
Answering and Managing Calls
Bridge Operator Console for RingCentral makes answering and managing multiple calls simple and intuitive. Our application also supports additional functionality with RingCentral Call Queues.

Calls currently ringing your device, or calls you have answered will appear in the window to the upper-left of the screen. If there are multiple calls, they will stack in the order received. You can select between calls within this window.

You can verify the selected call in the 'Selected Conversation' box below. This is also where we will find the 'Answer' 'Hang Up' 'Hold' 'Resume' 'Start Recording' 'Stop Recording' 'Mute' 'Unmute' 'Park' and 'DTMF' functions. Clipboard links to copy the caller's phone number or name are also available.
Utilizing our optional AI integration (more on that later in this manual) this section can display a call sentiment icon, as well as a clickable 'AI Caller History Summary' icon to the left of the 'Copy Number to Clipboard' and 'Copy Name to Clipboard' icons to the right of the caller information.
Calls in Queue
The Calls in Queue section will display a list of calls currently queued with RingCentral Call Queues. Calls will stack in the order they enter Call Queues. You will have visibility into the name of the individual RingCentral Call Queue, the Caller ID #, a timer indicating how long the call has been waiting in Queue, and a pick-up button to answer the call from queue.

You can assign your various queues a cooresponding color, which will be indicated by the phone icon to the left of this window (in this instance we have set our queue to display as blue). This allows you to easily distinguish between calls in your various queues at a glance, while the queue name and individual caller information is also visible. To change the color of a queue icon, simply right click on a queue in the 'Queue Activity' section of the screen, located to the lower right corner.
Company Directory
The Company Directory is the primary window within the application. The search function at the top-left center of the window allows you to search for users within your organization. Additionally, you can select a group to view the users assigned to that group. We will cover groups in more detail in a later section. The Company Directory will display user information such as 'Name' 'Extension' 'Activity' 'Department' 'Title' and 'Type'.
You can also enable our optional Microsoft Integration to display the 'MS Activity' column. Additional information is available with the icons in the column to the left including External Shared Contacts, Microsoft Contacts, Google Contacts, and Call History. Microsoft Integration will be covered in a separate section further into this manual.

Various address books are accessible by the icons to the left within the company directory. You will find 'Company Directory' (users within your organization who have RingCentral accounts), 'RC External Shared Contacts', 'Microsoft Entra AD', and 'Google Workspace'.
There are links to the 'AI' window containing caller history with a transcription, sentiment, AI assistant, and AI coach links to the left of the individual calls. More on this optional integration later.
How to Transfer a Call
Selecting a user from within the Company Directory will open the Contact Card. Our supported Call Control options are 'Transfer' 'Consult Transfer' 'Add to Call' 'Transfer Mobile' 'Transfer Voicemail' and 'Park Call for User'.

If a user has additional numbers, we can use the drop-down menu to the right of the Call Control window to access these numbers.

Call controls can also be accessed by right-clicking on a user. This will display the full list of available transfer options, as well as a contact section and a supervisor section (permissions required on the RC user side to access the supervisor functions).

Contact Card
The Contact Card also contains the 'User Information' 'Notes' 'Contact Information' 'Intercom' 'Related People' and 'Call Forwarding' sub-menus. Examples of these sub-menus are shown below. The Contact Card can also display the optional menus 'Custom Fields' 'Microsoft Information' 'User's Schedule' and 'Admin Tools'. Please note, the Microsoft Integration will be covered later in the material.

Parking Lot
Bridge Operator Console is able to display a list of all calls in the general RingCentral Parking Lot. The Parking Lot will display the 'Park Dial' 'Caller ID #' 'Name' 'Parked For' 'Parked By' and 'Time Waiting'. Calls can be retrieved from the Parking Lot by using the pick-up button highlighted in the picture below.

Groups
The Groups section will display lists of users built from user information stored at RingCentral. Our application will read in this user information and automatically create and auto-populate these groups based on a department, title, office location, or call queue members. You can click on a group to display the users associated with that group.

You can create new private groups (visible only to the user who created the group) or a new shared group (visible to all users of our application within the organization) with the icons at the bottom of this section. You are also able to rename an existing group, change your default group, hide a group, or refresh the group list.
Queue Activity
The Queue Activity section will display RingCentral Call Queues. You can filter this information in our Settings. We will display the names of individual queues, as well as the current count of calls waiting in each queue. As mentioned earlier in this document, Call in Queue will appear in the lower left of the screen in a list where users are able to view and answer queue calls. Right-clicking a queue allows you to change the cooresponding color, or view your list of queues to manage sign-in and sign-out selectively.

Microsoft Integration
To enable our optional Microsoft Integration, you will first need to authorize our application. These authorization links are done at an organization level, and can be accessed from our website www.bridgeoc.com under the 'RingCentral' drop-down menu. Once completed, you will want to enable the integration in our Settings. Please ensure the integration has been authorized prior to attempting to enable the integration within our application.

We have updated our optional authorizations to include a 'Authorize 2 Way Teams Chat'. This will allow you to access a full Teams chat session within our application and supports both individual and group chat.

The chat icon on a user's contact card can access a Teams chat window with the selected user. You can access your Teams Group Chats from the 'Microsoft" icon in the toolbar to the upper-right corner of the screen.

The Microsoft 365 section of our settings has several optional toggles. You can enable the MS Teams Presence as displayed in the Company Directory. You can enable the Auto Search to search the standard directory and Microsoft AD with the search bar simultaneously. You can optionally also display your Teams Groups within the Groups section.
AI Assistant Features and Integrations
You can enable the AI Assistant features within the settings. You will require a key from one of the supported AI Assistants, accessible from the drop-down menu. Toggle switches allow you to enable call transcription, as well as enable the AI Assistant to run automatically upon answering a call. 
Opening the AI Assistant will display a window containing the 'Transcript' from a call, the 'Call Summary', the 'Highlights', and the 'Action Items'. You can easily copy the transcript or any generated text to your clipboard. Icons to the right under the 'Generative Tools' section allow you to format this information for an Email, SMS, Blog, KB Article, Social Media Post, Customer Product Recommendation, or CRM Summary.
Questions or Support
There are support resources available within the application. From the toolbar at the top of the window, select 'Help'. You will find a link for our Web Chat Support, the option to Open a Trouble Ticket, and Schedule Remote Support.

We hope this manual has been informative, please do not hesitate to contact our team if you have any additional questions.